
Gingerbread House Treat Box, Gingerbread House Pillow Box and 2 Gingerbread House Cards!!
Hello Crafty Friends!!
Larissa here today to share SEVERAL different ways to create with the NEW Gingerbread House Treat Box Add-on Die Set!! I LOVE being able to STRETCH my Products and there are SO MANY FUN ways to use this Die Set besides just using it for a Treat Box!! I hope these Projects INSPIRE you to get Creative and use this Die Set for MORE than just your Holiday Treat Boxes this Christmas!! 
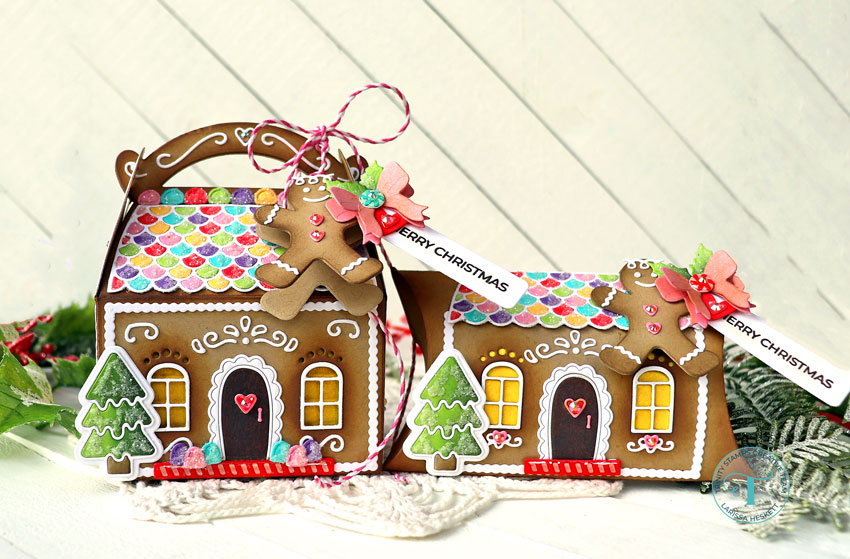
I’m starting with the Original Use for this Die Set and combining it with the coordinating Treat Box Die Set!! I Die Cut the Base from some Kraft Cardstock that I inked with some Gathered Twigs Distress Oxide Ink!! Part of the FUN for me when creating this Treat Box was the Idea that the recipient can SAVE this Treat Box and use it for a Decoration in their Home or Craft Room!! So I really thought about that when I was Designing it!! I Die Cut ALL of the Frosting Decoctions from some White Cardstock!! Then I Die Cut ALL of the Candy Pieces from a Bright Rainbow Color Scheme!! I wanted to create an inlayed Candy Roof so I Die Cut the Roof 2 Times from all 6 Different Cardstock Colors and that was enough to create ALL 5 of my Inlayed Candy Roof Pieces!! (I used the Same Roof Design for ALL of my Projects) 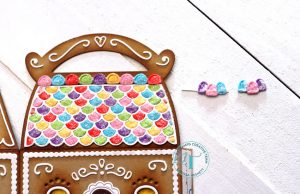
I also used a Row of Gum Drops to decorate along the top of the Roof Line!! In order to create a Line I Cut a Strip of White Cardstock and then Lined them up making it easier to adhere them to the top of the Roof Line!! Then I added some Rock Candy Distress Glitter for some Sparkle and Shine!! I created the Groups of 3 Gum Drops for the Sides of the Door and LOVE how they turned out!! 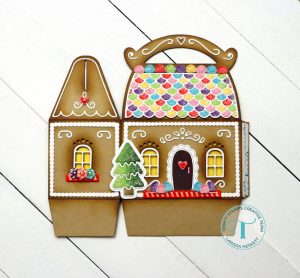
Here’s a look at the Front of the Treat Box!! I LOVE being able to add ALL of the Decorative Elements and I used a Midas Touch Sparkle Pen to add some Glitter to the inside of the Windows for even more Sparkle!! I also used Glitter Pen and Glossy Accents to add Sparkle and Shine to the Candy Stick front Porch, Candy Stick Window Box, Peppermint Candies and the Heart Details!! 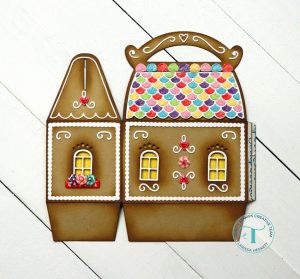
Here’s a look at the Back of the Treat Box!! There are SO MANY different ways to combine ALL of the different Elements and its FUN to mix things up for different Designs!! Even choosing different Color Palettes can change to entire Design of this Treat Box!! 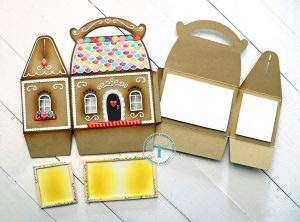
I wanted to create a 3-D look to the Windows, so I Die Cut them out from the Base of the Box!! You could leave them Open for a peek as to what’s inside of the Box!! You could add Vellum or Acetate to the Windows for a FUN See through feel, but having the Windows Closed!! I chose to add some Inked Cardstock Panels with Foam Tape for a 3-D Feel and I LOVE the way it looks!! 
I adhered the Panels together and here’s a look at the SWEET Treat Box assembled!! So ADORABLE and it can be filled with your choice of things to give as a Gift to someone SPECAL!! 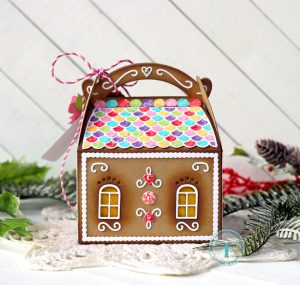
Here’s a look at the back of the Treat Box!! Remember this Box can also be used as a Decoration for the Recipient after the Gift is given!! So essentially its 2 Gifts in one!! I think it would be FUN to include a String of Mini Lights and they can be used to Decorate either around or inside of the Box for even more Holiday Charm!! 
Here’s a look at the Side of the Treat Box!! I LOVE the way these Candy Stick Window Boxes turned out Filled with some Peppermint Candies for EXTRA Sweetness!! 
To finish the Treat Box off I created a SWEET Gingerbread Man Shaped Gift Card with some Tags and a Bow and Greenery finishing Touch!! I used my Stash to combine Products and the Gingerbread from the Santa Mug Die Set and I Die Cut it once from Kraft Cardstock and then again on a Folded Kraft Cardstock Piece in order to create a Shaped Gift Card!! I added the Squiggly Hair from the Gingerbread House Treat Box Die Set!! I LOVE to use my Dies creatively and this Gift Card makes me SMILE!! 
Then I Die Cut Holly Leaves from some Green Cardstock also using the Santa Mug Die Set along with the Bow from the Holiday Candle & Botanical Die Set from some Pink Cardstock!! Then I Die Cut 2 Tags from the Bitty Tags Die Set the Tag Die was Cut from some White Cardstock and the Heart Tag from some Red Cardstock!! Then I Stamped the Sentiment from the A Sentiment for (almost) Everything Stamp Set!! 
I attached the Tag to the Handle of the Box with some Twine and I feel like its the PERFECT finishing touch to this SWEET Gingerbread House Treat Box!! 
The Treat Box if AMAZING, but you can also use the NEW Gingerbread House Treat Box Add-on Die Set to Decorate a Pillow Box, using the Pillow Box Die Set!! 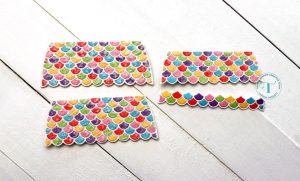
The only thing I had to alter was the Size of the Candy Roof!! This Die is SO EASY to alter with the Scalloped Edge and I just used my Scissors to cut along the edge to remove 2 Rows to make the Roof fit the Pillow Box!! You could have it hang off the Pillow Box too, but I felt like it was more sturdy this way!! 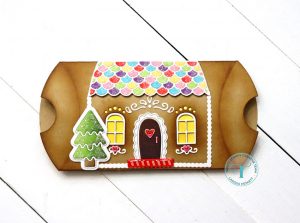
Here’s a look at the Pillow Box all decorated!! I prefer to adhered everything to the Pillow Box while it s Flat and then once everything is adhered you can pop it together!! 
I finished off the Pillow Box with another SWEET Gingerbread Man Shaped Gift Card and I LOVE how this turned out!! So if you didn’t want to go to all of the work to create a 3-D Treat Box, this has the same AMAZING WOW Factor, but because it’s just decorating the Front of the Pillow Box its a faster Design option!! 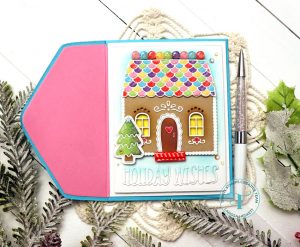
Next I’m sharing how you can use the NEW Gingerbread House Treat Box Add-on Die Set to create a Card too!! I Die Cut all of the Elements to add to the Gingerbread House!! 
I Die Cut the “Holiday Wishes” Sentiment from White Cardstock using the Mini Winter Greetings Die Set!! Then I adhered it to the Card Panel Die Cut from White Cardstock using the Modern Embossed Rectangle Stack Die Set!! I Inked with some Salvaged Patina Distress Oxide Ink and then adhered the Gingerbread House using Foam Tape for some Dimension!! 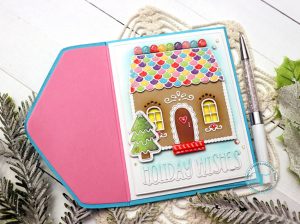
I added some Fairy Rocks Rhinestones to finish off the Design with even more Sparkle and I LOVE the way this Die Set can be used to create Scenes for your Holiday Cards!! 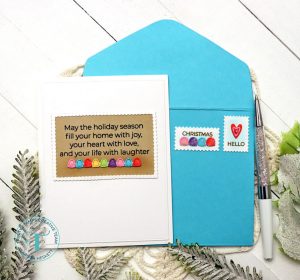
For the inside of the Card I Stamped and Embossed the Sentiment from the Insider Sentiment Christmas Stamp Set and I used the Gingerbread House Panel for the Border to coordinate with the front of the Card and then added the same Gum Drop Border to finish off the Sentiment!! Then I created the coordinating Envelope using the NEW A2 Envelope Builder Die Set!! 
Then I created some Christmas Stamps for the outside of the Envelope to coordinate with the Card!! I used the some of the same Decorations and the Sentiments are from the A Sentiment for (almost) Everything Stamp Set!! I LOVE the possibilities with these Stamps from the De Set and I LOVE how they finish off the Envelope Design!! 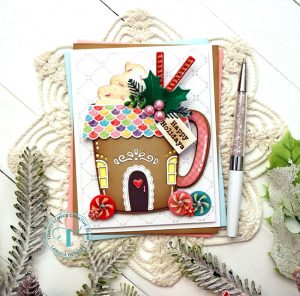
Lastly I’ve created this Festive Gingerbread House Mug Card!! If you played along with the Fall | Winter Coffee Lovers Blog Hop, you might have seen this Card I shared!!?? I LOVE that you can adjust this Die Set and use it with other Die Images that you have!! I even think this would make a BEAUTIFUL Tag for Holiday Gifts as well!! 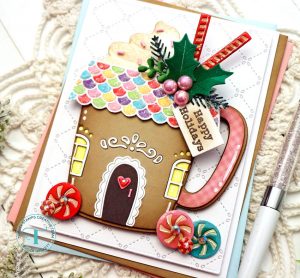
I Started by Die Cutting the Beary Cute Layered Mug Die Set from some Kraft Cardstock that I inked with some Vintage Photo Distress Oxide Ink!! Then I Die Cut the Handle from some Doodlebug Design Gingham Patterned Paper that I also inked with Vintage Photo Distress Oxide Ink!! 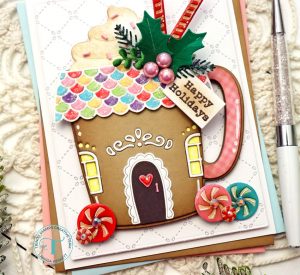
Next I Die Cut the Decorative Pieces from the Gingerbread House Treat Box Add-on Die Set!! I added the different Colors to create the Roof and added Rock Candy Glitter for some Sparkling Snow!! Then I Die Cut the Windows and added the White Die Cut Window Frames on top!! Then I added some Greenery to the Top of the Mug from the NEW Holiday Candle & Botanical Die Set!! I Die Cut from some Pine Green and Teal Waters Deco Foil Plush Papers!! I added some Copic Marker Shading as well as some Rock Candy Glitter for the look of Glittering Snow!! To finish off the Mug I Die Cut some White Cardstock using the NEW Bitty Tags Die Set!! I Inked the center of the White Cardstock Tag with some Vintage Photo Distress Oxide Ink and then Stamped and Embossed the Sentiment from the Simply Sentimental Holidays Stamp Set using Gathered Twigs Distress Oxide Ink and WoW Clear Gloss Embossing Powder!! 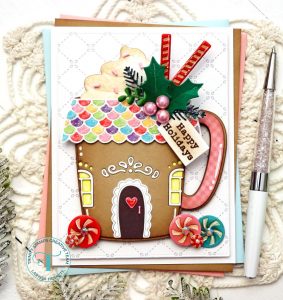
Then I added some Peppermint Candies from the Sweet Holiday Wishes Die Set!! I added some Inking and Glossy Accents for some Dimension and Shine and then added a Fairy Rocks Rhinestone to the Center for even more Sparkle!! Everything was added to a White Cardstock Die Cut Card Panel using the A7 Diamond Eyelet Background Die!! SWOON!! I LOVE how this turned out and I hope it INSPRES you to get CREATIVE with some of your FAVORITE Die Sets and Embellishments to STRETCH the use of this Gingerbread House Die Set even more!!
I hope I’ve given you some IDEAS to STRETCH this De Set and that you can use that to look at other Die Sets in your Stash that can be used in combination with some of the other Products in your Stash to bring NEW LIFE to them!! It’s SO FUN being able to see how FAR you can STRETCH your Stash!! Especially when the finished Projects are SURE to be CHERISHED by the very SPECAL Recipients!! 
Here’s a look at the NEW Tag-Along Die Set!!
(FREE w/ $35.00 Purchase Tag Die Set available while supplies last!!)  Here’s a STUNNING Card I created using this AWESOME Set!! I ADORE Snowflakes and I LOVE that you can use them ALL Winter Long!! Plus, there are so MANY ways to use this Set!! Get yours while Supplies Last!! I PROMISE it’ll become one of your FAVORITES for the Holiday/Winter Season!!
THANKS SO MUCH for stopping by today!! If you create something please share with us on Social Media using the #hastag #trinitystamps #trinitystampsllc as we LOVE to see what you’ve created!!
You can join us in our FB Community HERE!! We have SEVERAL Games and Challenges gong on here too!!
I hope you have a FABULOUS and BLESSED Thanksgiving Day/Week/Weekend!! Make sure you continue to visit us as we continue to share Projects to INSPIRE you using Trinity Stamps Products that we ADORE!!
LARISSA HESKETT 


