

Sweets!!
Hello Crafty Friends!!
Larissa here today to share a SWEET Scene Card using the NEW Cozy Bear Sweet Shop Stamp Set and coordinating Cozy Bear SWEET Shop Die Set!! This set can be used to create a Scene on ANY Size of Card and is so FUN to Design with, especially if you are a FAN of the Cozy Bear Collection as you can Mix-n-Match ALL of the different Elements from the different sets!! Let’s get started!! 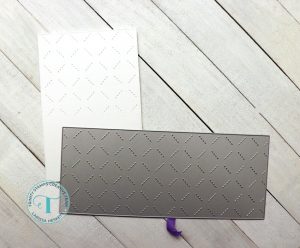
I stared by Die Cutting my A7 Card Panel using the A7 Modern Embossed Layers Die Set from White Cardstock!! Then I wanted to add some texture to resemble Decorative Wall Paper, so I used the Slimline Series Quilted Cover Die Set and ran it across the top 3/4 of the Card Panel!! I used my Cutting Plates to make sure that it didn’t cut the bottom of my Card Panel off so it remains ALL on Card Panel!! Then I used some Salvaged Patina Distress Oxide Ink to add some Color and help make the Quilted Design POP of the Card Panel!! 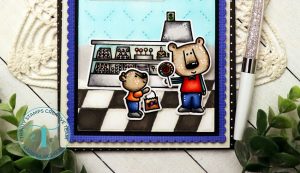
Next I wanted to add a FUN Floor to the Design, so I used my Copic Markers to create the Checkered Design and then Colored with Copic Markers!! I used N0, N2 for the White Tiles and N8, N6 for the Black Tiles!! I LOVE the warm feel it adds to the overall Design!! 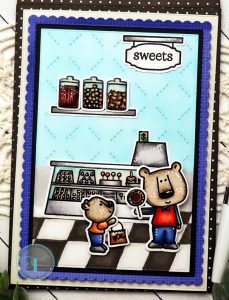
Next I Stamped and Embossed all of the Images for the Cozy Bear Sweet Shop Stamp Set then colored them in using Copic Markers!!
Red: R00, R14 & R37 Orange: YR00, YR18 & YR68 Blue: B32, B34 & B37 Bears: E40, E43 E44 Black: N3, N5 & N8
Grey: N0, N3 & N5 Green: YG61, YG63 & YG67
Then I used the coordinating Cozy Bear SWEET Shop Die Set to Die Cut the Images out!! I added White Gel Pen details for Highlights, Black Glaze Pen to the Bear Noses and Eyes for Dimension and to make them POP, then I added Glossy Accents to the Glass Jars, Glass Counter Case and Sucker for some Dimension and Shine!! These steps aren’t necessary, but I feel like they really help to make the Scene seem more realistic!!
I adhered all of the Images to the Card Panel to create my Scene and I LOVE how the Scene came to LIFE!! 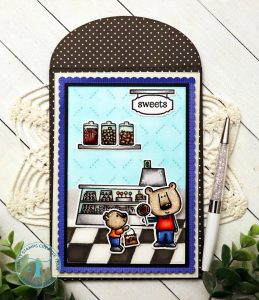
I Dis Cut another A7 Modern Embossed Layers Die Set from some Black Cardstock and then a Scalloped Panel using the A7 Envelope Builder Die Set from some Doodlebug Patterned Paper then adhered it to a A7 Cardbase from White Cardstock!! I also used the same A7 Envelope Builder Die Set to create a coordinating A7 Envelope using some more Doodlebug Patterned Paper!! I LOVE the way the card turned out and how FUN it is to be able to create such SWEET Scenes and it’s AWESOME to be able to create a coordinating Envelope to finish off the Design!!
THANKS SO MUCH for stopping by today!! If you create something please share with us on Social Media using the #hastag #trinitystamps #trinitystampsllc as we LOVE to see what you’ve created!!
You can join us in our FB Community HERE!!
Have a FABULOUS WEEK and make sure to come back and visit as there’s LOTS of AMAZING Inspiration being shared this Week via the Blog, IG and YouTube!!
Larissa Heskett


