

Shaped Tea Cup Card using coordinating Stencils in Different Ways!!
Hello Crafty Friends!!
Larissa here today to share a SWEET Shaped Tea Cup Card using the coordinating Layered Tea Cup Stencil in some FUN ways to add details to the Tea Cup!! 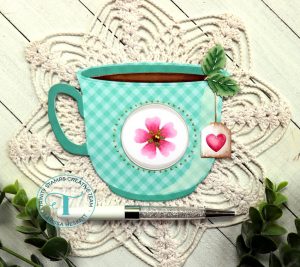
I LOVE the idea of being able to use your FAVORITE Patterned Papers and then adding Details with the Coordinating Stencils and Dies!! The possibilities are ENDLESS!! Let’s get started!! 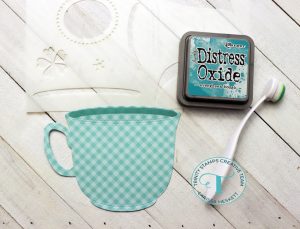
I Started by Die Cutting the NEW Trini-Tea Card Die Set from some Doodlebug Patterned Paper!! I Sprayed the back Side of the NEW Layered Teacup Stencil Set with some Pixie Spray and then placed it over the Tea Cup in order to Ink the Shadow on the Inside of the Cup using some Evergreen Bough Distress Oxide Ink and an Ink Blending Brush!! 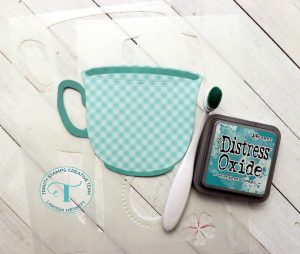
Next I placed the Stencil over both the Bottom of the Tea Cup and the Handle of the Tea Cup and Inked with the same Evergreen Bough Distress Oxide Ink!!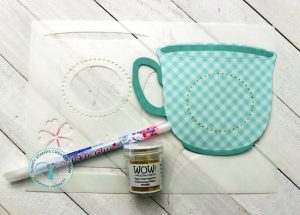
I wanted to add some BEAUTIFUL Gold Metallic Detail to my Tea Cup, so I Placed the Stencil over the Tea Cup and pressed it into Place!! Then I took and Quickie Glue Pen and placed Glue Dots inside the Stencil Design, being careful not to place too much Glue so the Design would be consistent!! Once I had the Design completely formed with the Glue Pen a very carefully removed the Stencil and then I added some of the WoW Pearl Gold Sparkle Embossing Powder over the Glue Pen Design and then Embossed the Design!! SWOON!! It’s such a SIMPLE Technique, but it adds a BEAUTIFUL Detail to the Tea Cup!! 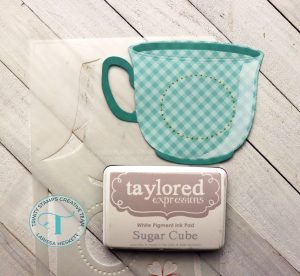
I wanted to add a Highlight to the side of my Tea Cup so I Placed the Stencil over the Tea Cup and Pressed it into place!! Then I Inked with some White Pigment Ink!! 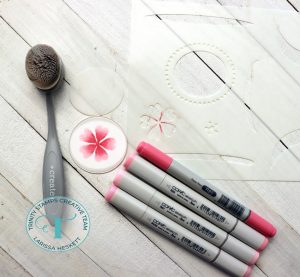
I Die Cut the Small Circle from the Embossed Edge Circle Stack Die Set from some White Cardstock and then used the Oval Stencil and placed it over the center of the Circle Die Cut and Inked with Pumice Stone Distress Ink!! Then I removed the Circle Stencil and placed the Flower Stencil over the Center of the Inked Circle Die Cut and pressed it into place!! Then I Colored in the Flower Design using Copic Markers!! Stenciled Flower: RV00, R81, R83 & R85!!
I LOVE the Soft look that you can achieve by using Copic Markers, but you could also use other Coloring Mediums for the same technique!! Think Colored Pencils and Watercolor Markers too!!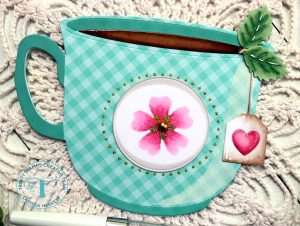
I adhered the Circle Die Cut into the Center of the Gold Embossed Oval and then I also Colored the Die Cut Tea Bag Die Cut and the Mint Leaves using Copic Markers to Color in the Die Cuts!!
Heart: RV00, R81, R83 & R85 Tea Bag: E40, E42 & E43 Leaves: YG61, YG63 & G19
I adhered them to the Tea Cup Edge and then applied some Glossy Accents over the Kraft Cardstock that I colored with Copic Markers for the Tea inside of the Tea Cup!!
Tea: E37 & E39 
So there you have a SWEET Shaped Tea Cup Card using the coordinating Layered Tea Cup Stencil in some FUN ways to add details to the Tea Cup!! I hope I’ve INSPIRED you to use the NEW Trini-Tea Card Die Set and coordinating NEW Layered Teacup Stencil Setin some NEW ways!!?? Think outside of the Box when using your Stencils as their are SO MANY different ways to use them!!
If you create something after being INSPIRED, I hope you’ll share with us on Social Media using the #hastag #trinitystamp #trinitystampsllc as we LOVE to see what you create!! Also you can join us in our FB Community HERE!!
THANKS SO MUCH for stopping by today and I hope you have a FABULOUS WEEKEND!!
Larissa Heskett


So pretty, fave part the leaves!