
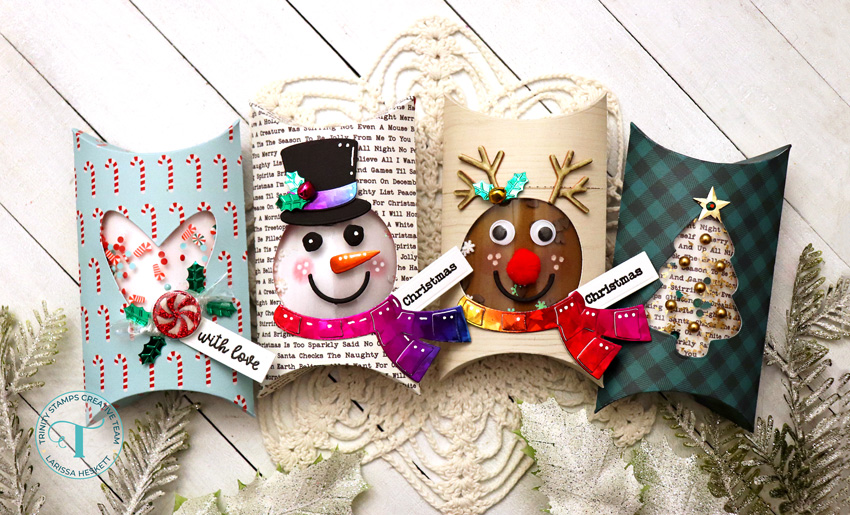
Adorable Shaker Pillow Gift Boxes!!
Hello Crafty Friends!!
Larissa here today to share one last Quick Holiday Gift Packaging Idea with you, these ADORABLE Shaker Pillow Gift Boxes!! SWOON!! If you follow me then you know that Shaker Cards are one of my FAVORITE Type of Cards to make!! So when I was thinking about my Holiday Packaging this Year I thought it would be AWESOME to be able to create some Shaker Pillow Gift Boxes using the NEW Pillow Gift Box Die Set!! 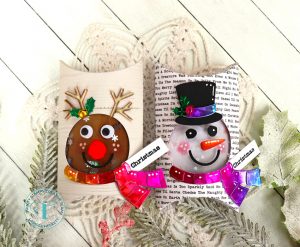
There are so many different ways to create these, you can use other Die Sets to create CUTE Critters or Snowmen!!
There are ENDLESS possibilities!! 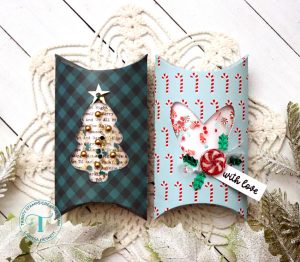
You can also create more simple designs using shaped Dies!! I’ve created a couple of both Styles to get your creative juices flowing!! Let get Started!! 
I Started by Die Cutting the NEW Pillow Gift Box Die from some Patterned Paper!! Then I used the Tree Die from the Sweet Holiday Wishes Die Set to Die Cut the Image from the center of the Pillow Box!!
(TIP: Make sure you Die Cut it from the Center of the Pillow Box with the Flap!! That way your edges are clean when you adhere the Box together)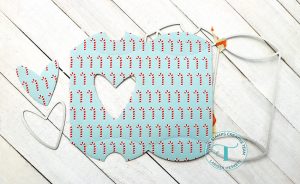
I repeated the process from another piece of Patterned Paper only this time, I’ve used the Heart Die from the NEW Pillow Gift Box Die!! 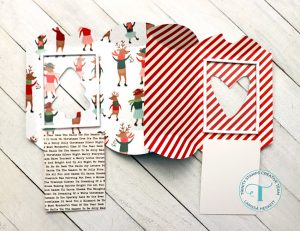
Next I Cut a Piece of Acetate large enough to cover the inside of the Die Cut!! I adhered it to the inside of the Pillow Gift Box using some 1/8″ Double Sided Adhesive Tape!! Then I adhered some 1/8″ Double Sided Adhesive Foam Strips around the outside of the Acetate, making sure the edges butt up closely to each other so that none of the Shaker Elements are able to escape from the Shaker Box!! I left the top of the Adhesive Covered so I could add my Shaker Elements without them sticking to the Foam Tape!! 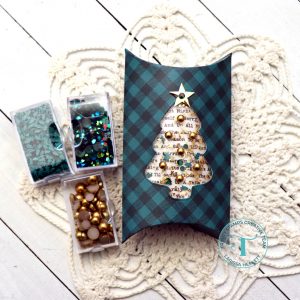
Next I added the Shaker Elements to the inside of the Shaker Box we created on the inside of the Pillow Gift Box Die!! For the Tree I used some of the Oh Christmas Tree Clay Embellishments, the Extravagant Emerald Rhinestone Embellishments and some Vintage Gold Glitter!! Then I removed the Foam Tape Protective Paper and placed a Piece of Patterned Paper over the Foam Adhesive pressing firmly into place so the Patterned Paper becomes the backing of the Shaker Window!! I folded the Pillow Bow together and adhered the Flap to the other side of the Pillow Box matching up the edges and then pressing firmly in place so its a TIGHT Seal!! I Folded the Pillow Gift Box Edges in to form the Pillow Box!! Then I adhered a Large Gold Sequin to the top of the Tree using a Zots Bling Adhesive Dot and some of the Gold Satin Bauble Embellishments to the Tree, again using Zots Bling Adhesive Dots to adhere them to the Acetate!! 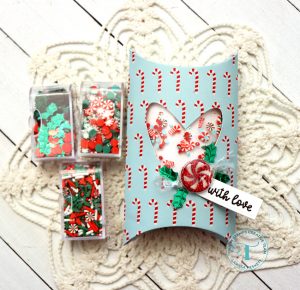
Again for the Second Pillow Box I added the Shaker Elements to the inside of the Shaker Box we created on the inside of the Pillow Gift Box Die!! For the Heart I used some of the Handmade Holiday Embellishments, the Christmas Candy Jar Holiday Sprinkles Embellishments and some Iridescent Snowflakes from my Stash!! Then I removed the Foam Tape Protective Paper and placed a Piece of White Cardstock over the Foam Adhesive pressing firmly into place so the Patterned Paper becomes the backing of the Shaker Window!! I folded the Pillow Bow together and adhered the Flap to the other side of the Pillow Box matching up the edges and then pressing firmly in place so its a TIGHT Seal!! I Folded the Pillow Gift Box Edges in to form the Pillow Box!! Then I adhered a Large Peppermint Candy that I made using the Sweet Holiday Wishes Die Set Die Cutting it from some Red and Iridescent Glitter and pieced together and then coated with some Glossy Accents to add some Dimension and Shine!! I Set it aside to Dry completely!! Once Dry I Cut a Piece of Clear Wrapping and twisted it around the Peppermint Candy to create a realistic looking Candy Piece!! Then I added it to the Top of the Pillow Box using some Zots Bling Adhesive Dots!! I added several Sequin Holly Leaves from the Boughs of Holly Seasonal Confetti Shaker Mix again using Zots Bling Adhesive Dots to adhere them to the Acetate!! Then I Die Cut a Mini Tag from the NEW Slimline Tags Die Set from some White Cardstock!! I Stamped and Embossed the “With Love” Sentiment from the NEW Holiday Tag Helper Stamp Set!! I Stamped with Versa Fine Black Onyx Ink and WoW Clear Gloss Embossing Powder!! I adhered it to the Pillow Gift Bow with another Zots Bling Adhesive Dot!!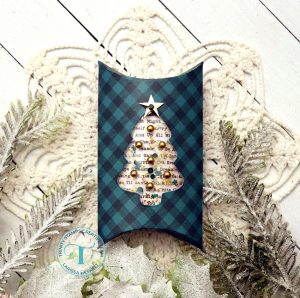
Here’s another close up Photo of the Tree Shaker Pillow Gift Box!! These are SO FUN to make and if you created them Assemble Line Style you could create several in a Few Hours!! Just PERFECT for those Holiday Gift Cards, Jewelry or any other Smaller Gift you plan on giving this Holiday Season!! 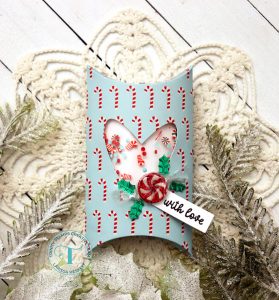
Here’s a Close up look at the Heart Shaker Pillow Gift Box!! SWOON!! This one has my HEART!! I LOVE Peppermint during the Holidays!! Think BEYOND the Holidays though, how FUN would this same design be for Valentines Day!!?? I know Christmas is just over yet but if you’re one of those Crafters who likes to get a jump start on your Valentines Day Projects this might be a PERFECT Design Idea!! Just Switch out the Patterned Paper and the Embellishments adhered to the outside of the Pillow Box and you’ll have an AWESOME Design for those you LOVE!! 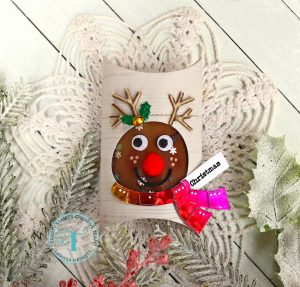
For my third Pillow Gift Box I wanted to Create a CUTE Reindeer Shaker Pillow Gift Box!! I used the exact same steps in order to create the Shaker Pillow Box Base!! I wanted a Textured Reindeer, so instead of just using Cardstock or Patterned Paper I decided to use some Therm O Web Deco Foil Flock Sheets in Tuscan Gold and Inked with Gathered Twigs Distress Oxide Ink to add some Shading!! Then I added some Cheeks with Worn Lipstick Distress Oxide Ink!! I used a White Gel Pen to add some Freckles and then added the Shaker Embellishments!! I used the Frosty Snowflakes Sprinkle Embellishments, the Vanilla Sugar Snowflake Sprinkle Embellishments, the Coffee Bean Heart Sprinkle Mix along with some Iridescent Snowflakes from my Stash!! 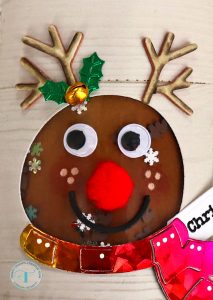
I used the Slimline Happy Snowman Die Set to create the Antlers, Mouth and Scarf for the Reindeer!! I Die Cut the Snowman Arms from White Cardstock to create the Antlers and coloring with Copic Markers E40, E43 & E47!! I Die Cut the Mouth from Black Cardstock and the Scarf was Die Cut from some Therm O Web Deco Foil Toner Sheets that I Foiled with Rainbow Shattered Glass Deco Foil!! I adhered some Wiggly Eyes and a Red Pom-Pom to the Acetate with some Zots Bling Adhesive Dots!! Then I adhered some Boughs of Holly Seasonal Confetti Shaker Mix again using Zots Bling Adhesive Dots to adhere them to the Antlers with a Mini Jingle Bell in the center for the Holly Berry!! I Stamped and Embossed the “Christmas” Sentiment from the NEW Simply Sentimental Happy Stamp Set using Versa Fine Black Onyx Ink and Embossed with WoW Clear Gloss Embossing Powder onto a White Cardstock Tag Die Cut from the NEW Slimline Tags Die Set!! SQUEAL!! This Lil’ Cutie just makes me HAPPY and there are so MANY Possibilities with the different Dies!! The only limit is your Imagination!! 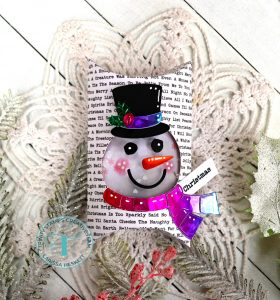
Again my Forth Pillow Gift Box I wanted to Create a CUTE Reindeer Shaker Pillow Gift Box!! I used the exact same steps in order to create the Shaker Pillow Box Base!! I wanted a Textured Snowman, so instead of just using Cardstock or Patterned Paper I decided to use some Therm O Web Deco Foil Flock Sheets in White Latte and Inked with Hickory Smoke Distress Oxide Ink to add some Shading!! Then I added some Cheeks with Worn Lipstick Distress Oxide Ink!! I used a White Gel Pen to add some Freckles and then added the Shaker Embellishments!! I used the Frosty Snowflakes Sprinkle Embellishments, the Vanilla Sugar Snowflake Sprinkle Embellishments, Mini Heart Confetti and Iridescent Snowflakes from my Stash!! 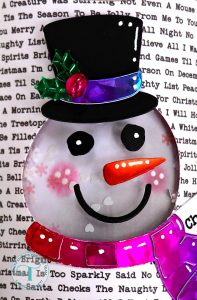
For the Scarf and Hat Band, I Foiled a Piece of Brutus Monroe Rainglow Deco Foil to a piece of Deco Foil Toner Sheets!! Then I Die Cut the Hat Band and Scarf from the Deco Foil Sheets!! I added the Hat Band to the Die Cut Black Cardstock Top Hat and added some Boughs of Holly Seasonal Confetti Shaker Mix again using Zots Bling Adhesive Dots to adhere them to the Hat Band with a Mini Jingle Bell in the center for the Holly Berry!! I LOVE the added touch it adds to the Top Hat!! Next, I adhered the Black Cardstock Die Cut Eyes and a Sweet Mouth again from the same Slimline Happy Snowman Die Set using some Ultra Bond Adhesive!! I Finished off the Design with some White Gel Pen Highlights and adhered the Scarf to the Pillow Box using some Zots Bling Adhesive Dots!! How ADORABLE is he!!?? I LOVE how the Elements add a Personality to Snowman!! These would be PERFECT for Personalizing for Teachers, Friends or Family Members!!
So there you have it, SEVERAL Ideas on different ways to create some ADORABLE Shaker Pillow Gift Boxes!! Whether you prefer the CUTE Critters, or the Simple Shaped Designs the possibilities truly are ENDLESS!! Plus, don’t just stop with Christmas Shaker Pillow Boxes!! Think Birthday’s, Shower Gifts, other Holidays like Valentines which will be here before we now it!! These are so FUN and EASY to create and I look forward to seeing what you Create using this Idea!!
THANKS SO MUCH for stopping by today!! If you create something please share with us on Social Media using the #hastag #trinitystamps #trinitystampsllc as we LOVE to see what you’ve created!!
You can join us in our FB Community HERE!!
Have a FABULOUS WEEKEND and the MERRIEST and BLESSED CHRISTMAS and a VERY HAPPY NEW YEAR’S!!
I’ll be back with more Inspiration after the New Year!!
Larissa Heskett


