
You’ll Always be my Best-Tea!!
Hello Crafty Friends!!
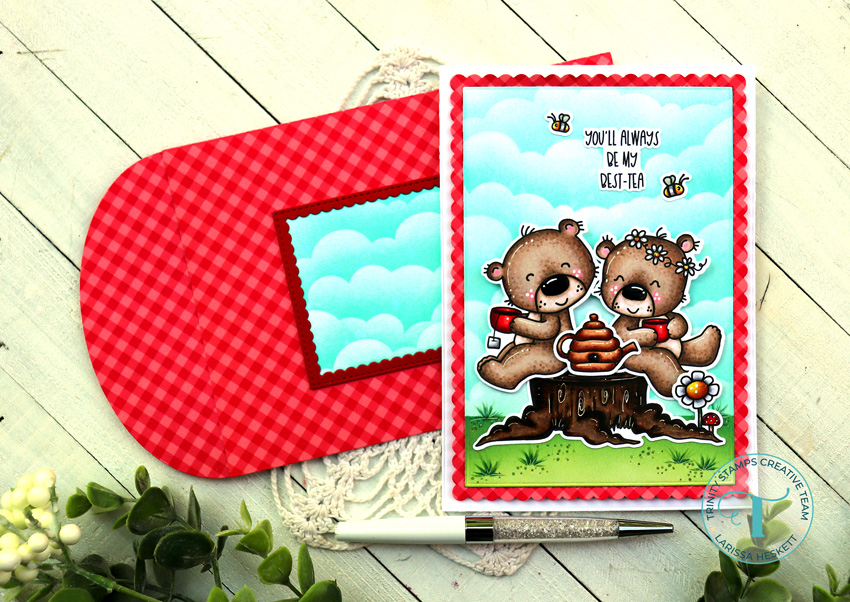
Larissa here today to share a SWEET Scene Card using the NEW Best Tea Party Stamp Set and coordinating Best Tea Party Die Set along with the NEW Modern Embossed A7 Layers Die Set and the A7 Envelope Builder Die Set!!
Let’s get started!! 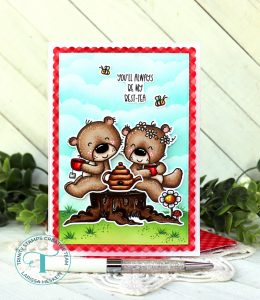
I Started by Creating my A7 Cardbase from White Cardstock!! Then I Die Cut the NEW Scalloped Die Cut from the A7 Envelope Builder Die Set from some Doodle Bug Gingham Patterned Paper!! Then I Die Cut the Card Panel from some White Cardstock using the NEW Modern Embossed A7 Layers Die Set!! 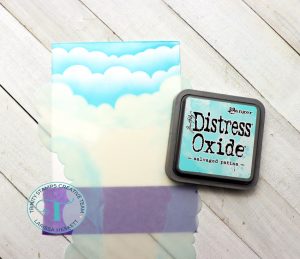
I Masked off the Ground using some Purple Tape and then I used the Puffy Cloud Layers Stencil to create the Cloud background using Salvaged Patina Distress Oxide Ink and my Blending Buddy Brush!! I removed the Mask and adhered it to the Cloud Background and then inked the Ground with both Peeled Paint and Lucky Clover Distress Oxide Ink again using my Blending Buddy Brushes!! I wanted to add even more texture so I used Copic Markers in E43, YG61, Yg63 & G18 to add some Grass and Pebbles!! I LOVE how it really sets the Scene!!
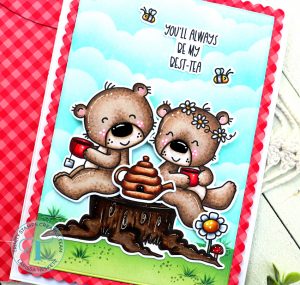
I Stamped and Embossed the Images from the Best Tea Party Die Set using Versa Fine Black Onyx Ink and WoW Clear Gloss Embossing Powder!!
Then I used Copic Markers to color them!!
Bears: E40, E42, E43 & E44 Cheeks & Inside of Ears: R11 Tummy’s and Faces: W00 & W2 Daisies: N0, N2, Y11 & YR23 Red: R11, R14, R37 & R39 Tree Stump: E43, E44, E47 & E49 Beehive Coffee Pot: E31, E33, E35 & E37 Bees: Y11 & YR23 N0 & N2 Bee Wings: BG10
Then I used the coordinating Best Tea Party Die Set to Die Cut the Images out!! 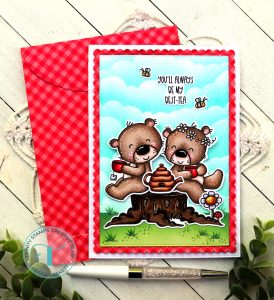
Next I created my Scene by placing the Images and adhering everything to the Card Panel!! It’s SO FUN using these images to create Scenes!! I added some White and Black Gel Pen Details for Highlights and to make the Noses Shine!! These little details aren’t necessary, but they REALLY make the Images come to LIFE!! 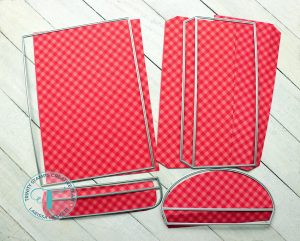
Next I created a coordinating A7 Envelope using the A7 Envelope Builder Die Set!! I used the same Doodlebug Gingham Patterned Paper and as you can see by the Photo above I Die Cut One Front Panel, 2 of the Back Panels and One each of the Bottom and Top Flaps!! There are several ways to create this Envelope, this is just the way I decided to create it today!! I adhered it together by adhering Double Sided Tape to the Flaps and and I just LOVE being able to personalize my envelopes to coordinate with the Card!!
Next I wanted to create a coordinating Envelope Label to add the recipients Address!! So I Die Cut the Scalloped Frame Die from the 4 Bar Card Die Set from some White Cardstock and again from some Red Cardstock!! I then Inked the White Panel again using the Puffy Cloud Layers Stencil to create the Cloud background using Salvaged Patina Distress Oxide Ink and my Blending Buddy Brush!! 
I LOVE how it coordinates with the Card and will look so BEAUTIFUL once the Address is added!! Once the entire Panel was Inked, I then adhered the Red Frame over the Panel and adhered it to the A7 Gingham Envelope!! 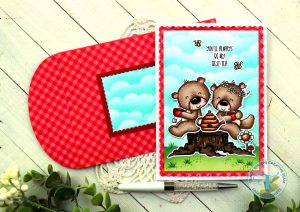
How SWEET is this Card and coordinating Envelope!!?? PERFECT for ANYONE Special!! The possibilities are ENDLESS and so are the Sizes!! If A7 isn’t your Jam, try using the AMAZING Trinity Stamps 4 Bar, A2, Slimline or even Mini Slimline!! There’s definitely a Size for EVERYONE!!
THANKS So Much for stopping by today and I hope you have a FABULOUS WEEKEND!!
Larissa Heskett


One thought on “You’ll Always be my Best-Tea!!”