
Homemade Wishes Pop-up Card
Welcome to my kitchen! It’s Bobbi Lemanski here with a pop-up card filled with homemade wishes. They say the best memories are made in the kitchen and I believe that’s true. Lots of great conversation and good laughs happen at meal times or while prepping for an event or simply making cookies. My kids’ and I make cookies together right on our center island. Those are precious times for me, especially as they near graduation this year.
My card today features the following Trinity Stamps products:
Cottage Kitchen stamp set and coordinating die set
Slimline Series: Room Builder Die Set
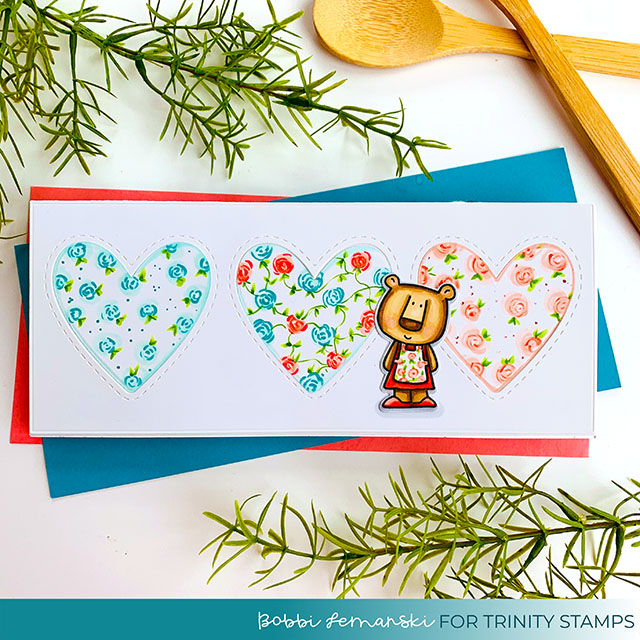
To make this slimline card, measuring 8-1/2″ Wide X 3-1/2″ tall, I started by die cutting the front panel heart trio die out of white cardstock. I removed the heart cut outs and hand drew three different designs on them to make them look like kitchen/apron type fabric patterns. I also stamped, colored and die cut two bears – one for on the front and one for inside the card. Notice the bear’s apron matches the print in the third heart. I used the following Copic Marker colors to color the bears and patterns:
- E59, E57, E55 (for the bear)
- R14, R22 (for the flowers), R20 (for the cheek and flowers)
- YG67 and YG03 (for the leaves)
- BG49, BG11, BG10 (for the flowers)
- C1 (for shading)
The front panel was attached to a white slimline card base and the hearts and bear were adhered in place as shown on the front panel.

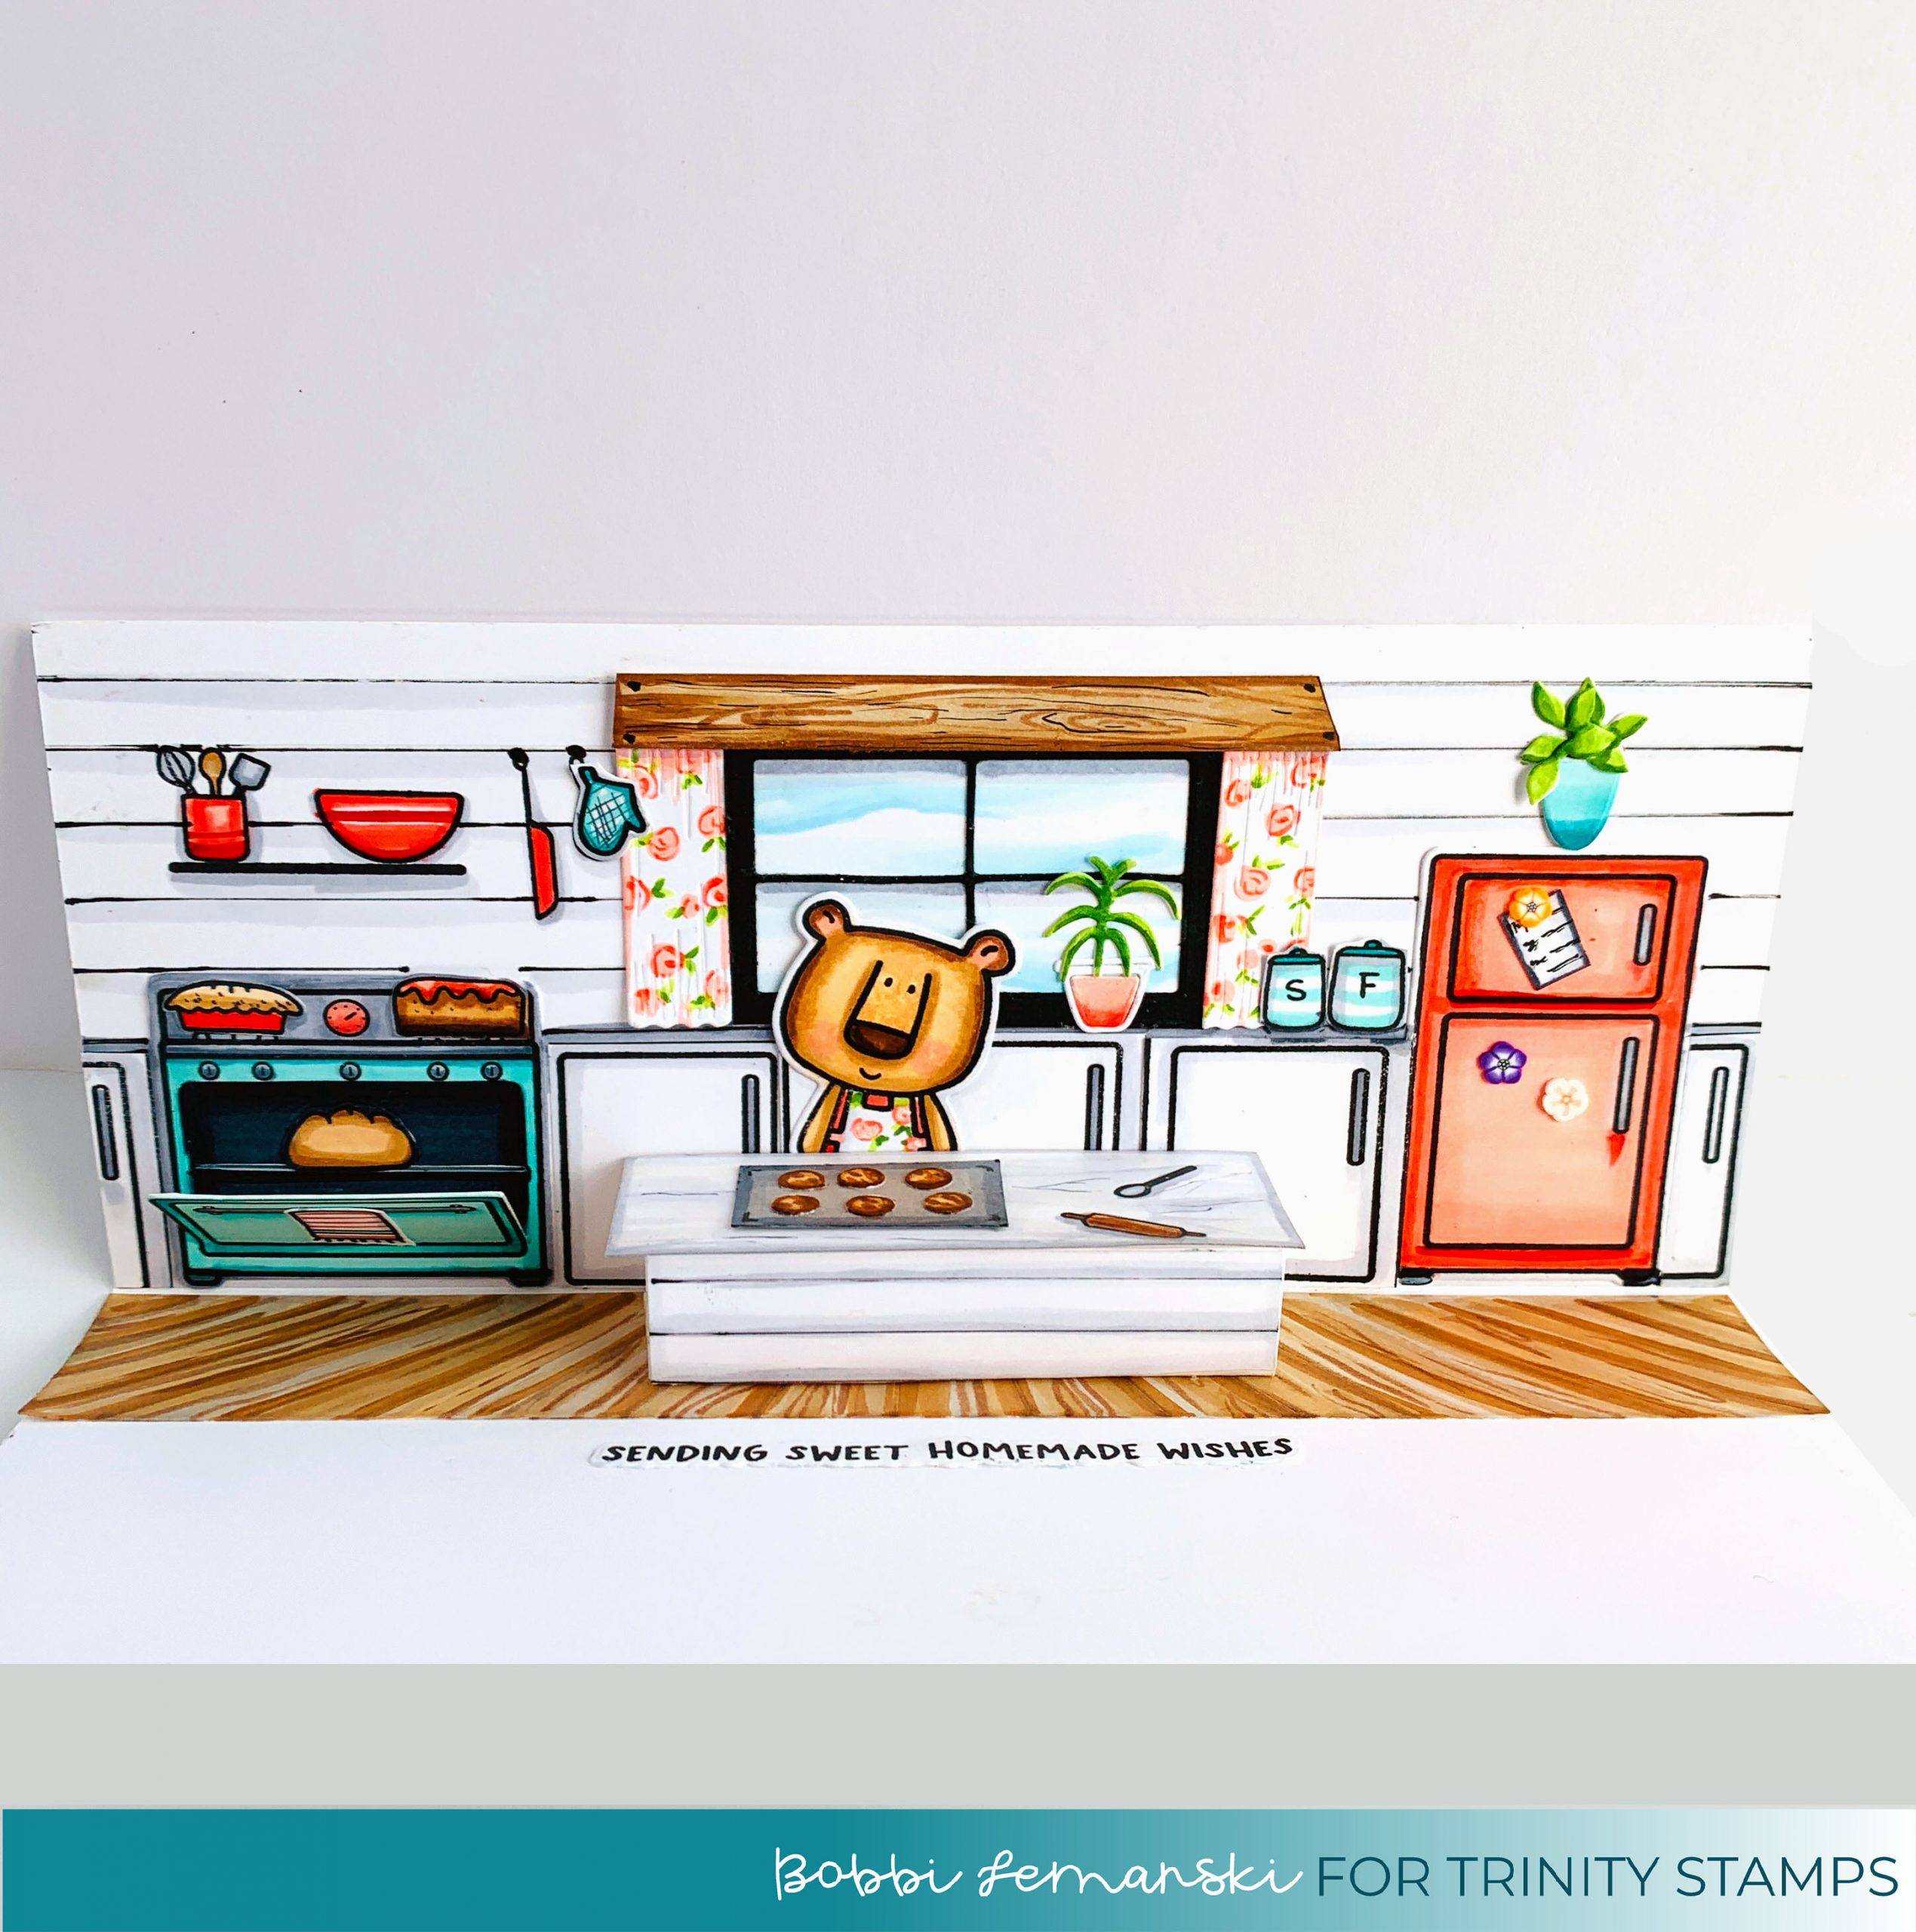
For the inside, I stamped, colored and die cut the appliances, cabinets and accessories from the Cottage Kitchen stamp set. This is the fun part. There are so many cute things you can add including bread in the interactive oven door! I used the same colors on the inside as listed above, for a unified look. I added the window, curtains, plants, and wood floor from the Slimline Series: Room Builder Die Set. I hand drew shiplap on the wall using a black .05 tip marker and ruler. Shading using a C3 and C1 under each plank board gives it dimension. I created wood graining on the floor and window cornice using E59, E57, E55 and E43. The blue cloudy sky in the window was colored in using BG000 and B00.
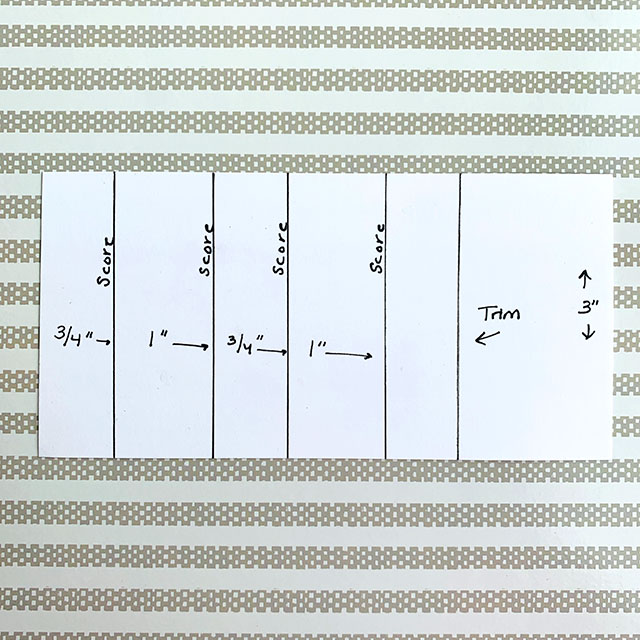
For the island that pops up, I created a support box that also acts as the island base. It measures 3″ wide X 3/4″ tall X 1″ deep. This is simple to do. It’s basically a 3″ wide X 4″-5″ piece of cardstock scored as shown above. I use my hands to mold it into a 3D box and adhere in place. Before I attached it, I added shiplap to one of the 3/4″ sides for the front of the island. (Use steps noted above for the wall shiplap.) I added double-sided strip adhesive to two adjoining sides – i.e., one of the 3/4″ (opposite of the shiplap side and one 1″ side for the base of the island.
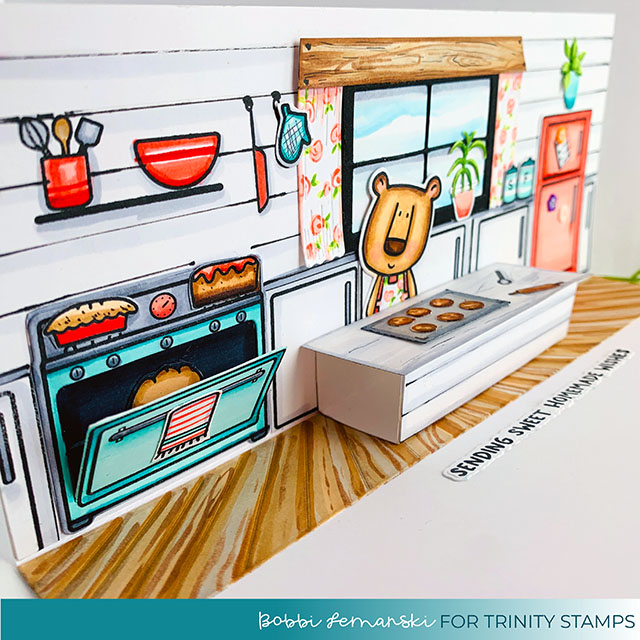
I positioned the bear on the back wall, behind where the island will be positioned. To attach the island, I made sure the pop-up island box was set deep in the fold before attaching it. This is important for it to pop up. Tip: If you try this, you want to make sure that both sides are fully attached. I fold the support box flat and position the scored line (between the sides that have tape) in the fold of the card. Fold the card flat and press to make sure it sticks completely. I cut a rectangle out of white cardstock that measures 3-1/4″ X 1-1/8″ and added faux marble graining to the top using a C3, C1 and C0 Copic marker. I attached the island top to the support box with double sided strip tape. I have a 1/8″ overhang on the outward three sides.
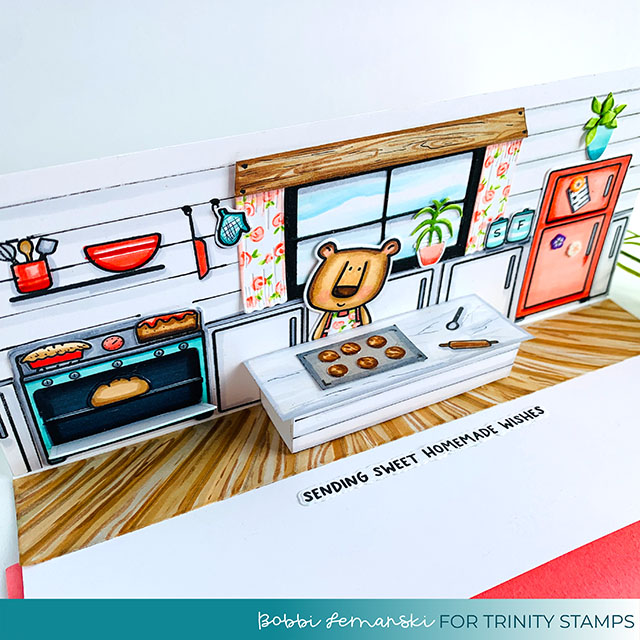
I embellished the island’s marble top by adding a cookie sheet of cookies and utensils from the Cottage Kitchen stamp set. Mrs. Bear’s batch of cookies look delicious, just like her fruit pie and breads, too! I kept things simple by using the same colors on the front and in the inside. I also repeated the rose pattern from the front heart to the apron and the curtains for repetition. Finally, I added the phrase to the inside. This interactive card is now ready to give to someone special who perhaps loves to bake!
You can shop the entire Trinity Stamps store here! If you decide to place an order, please use the links in this post so that Trinity Stamps knows which ideas inspired you!
Thanks for stopping by today. If you want to see more ideas and inspiration from me, subscribe to my blog, BobbiHartDesign.com. I’ll send you updates on new posts! You can also find me on Instagram as @BobbiHartDesign and on Facebook as BobbiHartDesign.


Wow! Thank you so much for the detailed post on how to make this! This is just fab!!!