
Friends are the Flowers…….
Hello Crafty Friends!!
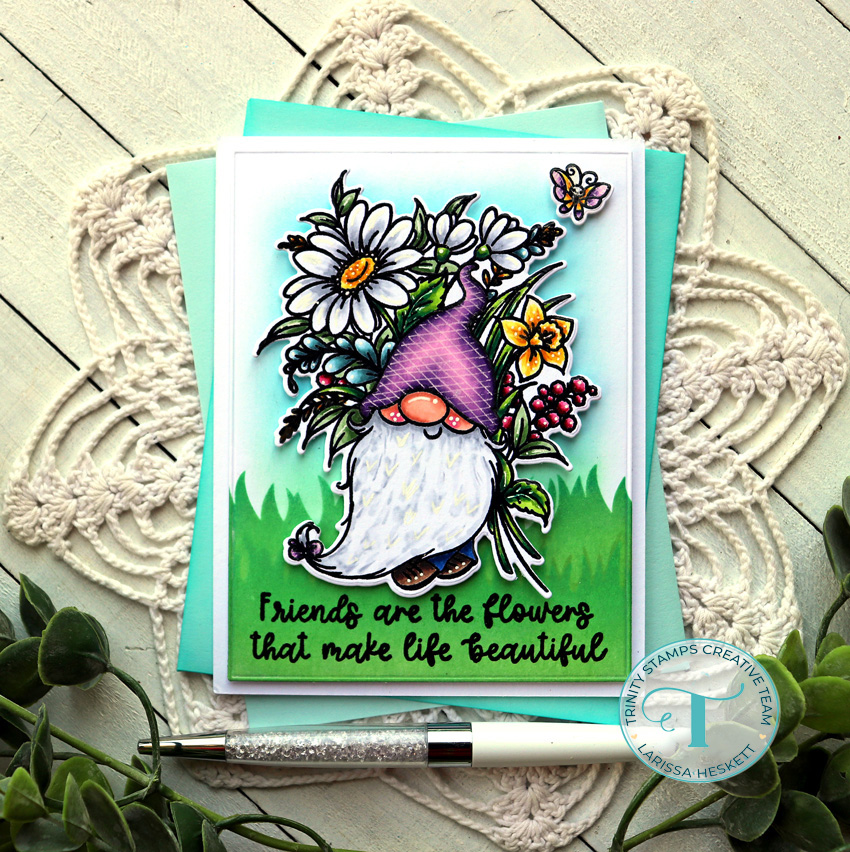
Larissa here today to share a BEAUTIFUL Friend Birthday Card using the NEW Friends are Flowers Stamp Set!! SWOON!! I just LOVE this Image and ALL of the occasions it can be used for just by changing up the Sentiment!! I also want to share how you can Customize the Images and Word Dies to add some Personality and make them your own!! Let’s get started!!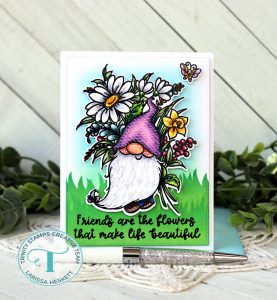
I Started by Stamping and Embossing the Image using Versa Fine Black Onyx Ink and WoW Clear Gloss Embossing Powder!! Then I Colored in the Image using Copic Markers!!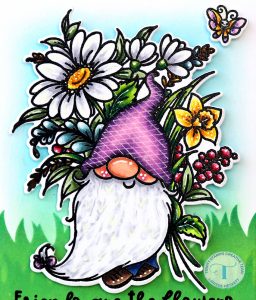
Greenery: BG70, BG72 & BG75 YG60, YG63 & YG67 YG03, YG17 & G18
Yellow: Y11, Y15 & YR23 Berries: R00, R39 & R89
Purple: V00, V01, V15 & V09 Jeans: B32, B34 & B37 Shoes: E40, E43 & E47
Skin: E00, E11 & E13 Cheeks: RV11 White: N0 & N2
I Die Cut the Image out using the coordinating NEW Friends are Flowers Die Set and then added some White Gel Pen Details and Highlights!! I also added some Silver Shimmer Pen to the Gnome Hat, Butterfly Wings and the Berries and some Midas Touch Gold Shimmer Pen to the Center of the Daisy and the Daffodil!!
TIP: It’s so FUN and EASY to Customize the Images using your Fine Tip Pens!! Whether it’s a White Gel Pen or some other Fine Tip Marker!! You can add details to add personality to the Images!! 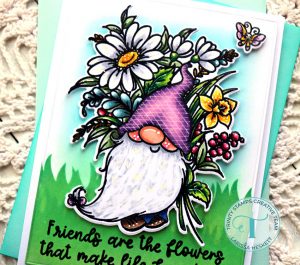
For the Card Panel I Die Cut the Second Largest Modern Embossed Rectangle Stack Die Set from some White Distress Watercolor Paper!! Then I Sprayed the backside of the NEW Spring Day Scene Builder Layering Stencil Set with some Pixie Spray and then adhered it firmly to my Card Panel, pressing it in place!! Then I Inked with Peeled Paint and Lucky Clover Distress Oxide Inks using the Blending Buddy Brushes!! I Moved the Stencil Up to create another layer of Grass and repeated the Process!! Then I inked the Sky with Tumbled Glass Distress Oxide Ink again using a Blending Buddy Brush!! Then I Stamped and Embossed the Sentiment using Versa Fine Black Onyx Ink and WoW Clear Gloss Embossing Powder on the bottom of the Card Panel!! I adhered the Images to Card Panel using Foam Tape for some Dimension and adhered the Card Panel to an A2 White Cardstock Top Folding Cardbase!!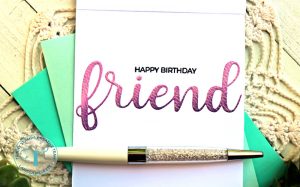
I LOVE adding a Sentiment on the inside of the Card that coordinates with the outside of the Card!! All of the AWESOME Trinity Stamps Word Dies make this process so EASY!! I’m using the “Friend” Die from the Slimline Series: Envelope Builder Die Set!! I Die Cut it from some White Distress Watercolor Paper and then inked with Milled Lavender, Dusty Concord and Wilted Violet for an Ombre` look to match the Gnomes Hat and Butterflies Wings on the front of the Card!! Then I added the same White Gel Pen Details and colored it with a Silver Shimmer Pen also to coordinate with the front of the Card!!
Who doesn’t LOVE a little SPARKLE!!??
I Stamped and Embossed the “Happy Birthday” Sentiment from the A Sentiment for (almost) Everything Stamp Set!! Then I adhered the “Friend” Die Cut and my Card is ready to send to a SPECIAL Friend for her Birthday!!
I hope I’ve INSPIRED you today, and that you give Customizing your Images and Word Dies a try!! It’s SO FUN to add some Personality to them to make them your own!!
Also, PLEASE Join us on June 19-25th as we CELEBRATE Trinity Stamps 3rd Birthday with an AMAZING NEW Release!! Sneak Peeks will be shared ALL Week with an IG Hop on the 25th which is also Release Day!! SQUEAL!!
Trust me you won’t want to miss out on ALL of the FUN!! 
THANKS so much for stopping by today and I hope you have a FABULOUS WEEK!! I’ll be back on Saturday with my First Sneak Peek!!
I CAN’T WAIT to share with you!!
Larissa Heskett


